|
|||||||||||||||
Luminary Micro LM3S811 ARM Cortex-M3 Port
|
|||||||||||||||


 |
There are currently four FreeRTOS ports for Luminary Micro Stellaris ARM Cortex-M3 based embedded microcontrollers - one that uses the ARM Keil tools, one for Rowley CrossWorks, one using the IAR tool suite, and one that uses Sourcery G++ (GCC from CodeSourcery). This page describes a demo targeted at the Luminary Micro LM3S811 evaluation kit (EKK-LM3S811). Instructions are provided for using the Keil, IAR and GCC tools.
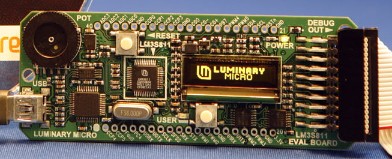
The LM3S811 evaluation kit includes a small low cost PCB that is powered, programmed and debugged through a single USB cable. It features connection points for the LM3S811 microcontroller pins, a small graphics LCD, a user button and a user LED.
See the LM3S102 demo applications for alternative projects that also demonstrate the use of co-routines.
Upgrading to FreeRTOS V5.0.3: FreeRTOS V5.0.3 introduced the configMAX_SYSCALL_INTERRUPT_PRIORITY configuration option to the ARM Cortex-M3 port. See the RTOS kernel configuration documentation for full information on this feature.
Upgrading to FreeRTOS V4.8.0: Prior to V4.8.0 the FreeRTOS kernel did not make use of the SVCall interrupt. From V4.8.0 onwards it does. Therefore, to upgrade an older project to the V4.8.0 standard, a small edit to the startup code is required. To do this, simply install vPortSVCHandler() in the SVCall position within the interrupt vector table (contained in the startup source file). The demo projects included in the FreeRTOS download have already been updated so these can be used as an example.
IMPORTANT! Notes on using the Luminary Micro LM3S811 port
Please read all the following points before using this RTOS port.See also the FAQ My application does not run, what could be wrong?
Source Code Organization
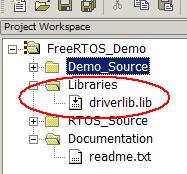
The FreeRTOS download contains the source code for all the FreeRTOS ports so contains many more files than used by this demo. See the Source Code Organization section for a description of the downloaded files and information on creating a new project.The Stellaris LM3S811 demo project file for the Keil/RVDS tools is called RTOSDemo.Uv2 and can be located in the FreeRTOS/Demo/CORTEX_LM3S811_KEIL directory.
The Stellaris LM3S811 demo project file for the IAR tools is called RTOSDemo.eww and can be located in the FreeRTOS/Demo/CORTEX_LM3S811_IAR directory. Note: If this project fails to build using the IAR tools then it is likely the version of IAR Embedded Workbench being used is too old. If this is the case, then it is also likely that the project file has been (silently) corrupted and will need to be restored to its original state before it can be built even with an updated IAR version.
The Stellaris LM3S811 demo makefile for the GCC tools can be located in the FreeRTOS/Demo/CORTEX_LM3S811_GCC directory.
The Demo Application
Demo application hardware setup
The demo application includes a task that writes to the UART. The LM3S811 evaluation kit will act as an RS232 to USB converter, enabling the written data to be viewed on a dumb terminal via the single USB cable. For correct operation the Luminary Micro supplied USB drivers must be installed. A prompt to install the drivers will be received when the evaluation board is first plugged in and detected by Windows. No further hardware setup is required.
Functionality
main() simply sets up the hardware, creates all the demo application tasks, then starts the RTOS scheduler. The Demo Application section of the FreeRTOS website provides more information on the standard demo tasks.In addition to a subset of the standard demo application tasks, main.c also defines the following tasks:
- A 'Print' task.
The print task is the only task permitted to access the LCD - thus ensuring mutual exclusion and consistent access to the resource. Other tasks do not access the LCD directly, but instead send the text they wish to display to the print task. The print task spends most of its time blocked - only waking when a message is queued for display.
- A 'Button handler' task.
The eval board contains a user push button that is configured to generate interrupts. The interrupt handler uses a semaphore to wake the button handler task - demonstrating how the priority mechanism can be used to defer interrupt processing to the task level. The button handler task sends a message both to the LCD (via the print task) and the UART where it can be viewed using a dumb terminal (via the UART to USB converter on the eval board). NOTES: The dumb terminal must be closed in order to reflash the microcontroller. A very basic interrupt driven UART driver is used that does not utilise the FIFO. The UART is configured for 19200 baud.
- A 'check' task.
The check task only executes every five seconds but has a high priority so is guaranteed to get processor time. Its function is to check that all the other tasks are still operational and that no errors have been detected at any time. If no errors have ever been detected 'PASS' is written to the display (via the print task) - if an error has ever been detected the message is changed to 'FAIL'. The position of the message is changed for each write.
Driver Library
The demo projects makes use of the Luminary Micro driver library provided by the development tool vendor or directly from Luminary Micro. For correct operation the driver library version must contain support for the LM3S811 evaluation board. The driver library is included directly within the project file or Makefile. Where the Keil tools are being used it may be necessary to adjust the path to the library to match the path to the Keil installation on your development machine.
The driver library is included in the project workspace or Makefile.
It may be necessary to adjust the path to the library
to match your development tool installation path.
Building and executing the demo application - Keil
Having ensured the driver library is correctly included in the project workspace:- Open the FreeRTOS/Demo/CORTEX_LM3S811_KEIL/RTOSDemo.Uv2 project from within the uVision IDE.
- Select "Rebuild all target files" from the "Project" menu. The project should build with no warning or errors.
- Connect the LM3S811 development board to your host PC and install the relevant USB drivers when prompted.
- Select "Download" from the "Flash" menu. After a few seconds the build window should indicate that the device was erased, then programmed and finally verified.
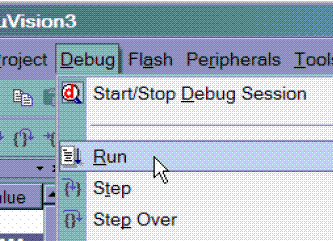
- To debug the application select "Start/Stop Debug Session" from the "Debug" menu, then click "Run" from the same menu.
Running the application in the debugger
Building and executing the demo application - IAR
- Open the FreeRTOS/Demo/CORTEX_LM3S811_IAR/RTOSDemo.eww project from within the Embedded Workbench IDE.
- Select "Rebuild all" from the "Project" menu. The project should build with no warning or errors.
- Connect the LM3S811 development board to your host PC and install the relevant USB drivers when prompted.
- Select "Debug" from the "Project" menu. The microcontroller flash memory will be programmed and the debugger started.
Building and executing the demo application - GCC
These instructions assume the Sourcery G++ tools are already installed, configured and included within the PATH environment variable.- Open a command prompt and navigate to the FreeRTOS/Demo/CORTEX_LM3S811_GCC directory.
- Type "Make", the project should build with no errors or warnings with the resultant binary placed in a directory called gcc
Example output:
C:\E\Dev\FreeRTOS\Demo\CORTEX_LM3S811_GCC>make
  CC    init/startup.c
  CC    main.c
  CC    ../../Source/list.c
  CC    ../../Source/queue.c
  CC    ../../Source/tasks.c
  CC    ../../Source/portable/GCC/ARM_CM3/port.c
  CC    ../../Source/portable/MemMang/heap_1.c
  CC    ../Common/Minimal/BlockQ.c
  CC    ../Common/Minimal/PollQ.c
  CC    ../Common/Minimal/integer.c
  CC    ../Common/Minimal/semtest.c
  CC    hw_include/osram96x16.c
  LD    gcc/RTOSDemo.axf

C:\E\Dev\FreeRTOS\Demo\CORTEX_LM3S811_GCC>
- Enter the GCC directory.
- Type "arm-stellaris-eabi-gdb RTOSDemo.axf" to start the debugger.
- Type "target extended-remote | arm-stellaris-eabi-sprite -r -s 2 -f lmi stdio" at the GDP prompt to connect to the board.
- Type "load" to program the microcontroller flash.
- Type "continue" to start the program executing.
Example output:
C:\E\Dev\FreeRTOS\Demo\CORTEX_LM3S811_GCC>cd gcc C:\E\Dev\FreeRTOS\Demo\CORTEX_LM3S811_GCC\gcc>arm-stellaris-eabi-gdb RTOSDemo.axf GNU gdb (Sourcery G++ 4.1-23) 6.5.50.20060822-cvs Copyright (C) 2006 Free Software Foundation, Inc. GDB is free software, covered by the GNU General Public License, and you are welcome to change it and/or distribute copies of it under certain conditions. Type "show copying" to see the conditions. There is absolutely no warranty for GDB. Type "show warranty" for details. This GDB was configured as "--host=i686-mingw32 --target=arm-stellaris-eabi". For bug reporting instructions, please see:
Configuration and Usage Details
RTOS port specific configuration
Configuration items specific to this port are contained in FreeRTOS/Demo/CORTEX_LM3S811_[compiler]/FreeRTOSConfig.h, where [compiler] is Keil, IAR or GCC. The constants defined in this file can be edited to suit your application. In particular -
- configTICK_RATE_HZ
This sets the frequency of the RTOS tick. The supplied value of 1000Hz is useful for testing the RTOS kernel functionality but is faster than most applications require. Lowering this value will improve efficiency.
- configKERNEL_INTERRUPT_PRIORITY and configMAX_SYSCALL_INTERRUPT_PRIORITY
See the RTOS kernel configuration documentation for full information on these configuration constants.
The lowest priority on a ARM Cortex-M3 core is in fact 255 - however different ARM Cortex-M3 vendors implement a different number of priority bits and supply library functions that expect priorities to be specified in different ways. Use the supplied examples as a reference.
Each port #defines 'BaseType_t' to equal the most efficient data type for that processor. This port defines BaseType_t to be of type long.
Note that vPortEndScheduler() has not been implemented.
Interrupt service routines
The interrupt vector table is contained within FreeRTOS/Demo/CORTEX_LM3S811_KEIL/startup_rvmdk.s, FreeRTOS/Demo/CORTEX_LM3S811_IAR/startup.c or FreeRTOS/Demo/CORTEX_LM3S811_GCC/init/startup.c (for the Keil, IAR and GCC demos respectively) and can be populated as required. In the demo applications the vector table remains in flash.Unlike most ports, interrupt service routines that cause a context switch have no special requirements and can be written as per the compiler documentation. The macro portEND_SWITCHING_ISR() can be used to request a context switch from within an ISR. See the UART ISR definition within the Keil/ARM LM3S102, GCC LM3S102 or IAR LM3S316 demo applications for an example.
Switching between the pre-emptive and co-operative RTOS kernels
Set the definition configUSE_PREEMPTION within FreeRTOSConfig.h to 1 to use pre-emption or 0 to use co-operative. The demo application will only execute correctly with configUSE_PREEMPTION set to 0 if configIDLE_SHOULD_YIELD is set to 1.Compiler options
As with all the ports, it is essential that the correct compiler options are used. The best way to ensure this is to base your application on the provided demo application files.Memory allocation
Source/Portable/MemMang/heap_2.c is included in the ARM Cortex-M3 demo application project to provide the memory allocation required by the RTOS kernel. Please refer to the Memory Management section of the API documentation for full information.Serial port driver
It should also be noted that the serial drivers are written to test some of the real time kernel features - and they are not intended to represent an optimized solution.
NXP tweet showing LPC5500 (ARMv8-M Cortex-M33) running FreeRTOS.
Meet Richard Barry and learn about running FreeRTOS on RISC-V at FOSDEM 2019
Version 10.1.1 of the FreeRTOS kernel is available for immediate download. MIT licensed.
View a recording of the "OTA Update Security and Reliability" webinar, presented by TI and AWS.
FreeRTOS and other embedded software careers at AWS.

![]()


![]()