|
Please note: From FreeRTOS V5.0.4 the port described on this page will be deprecated and replaced by a new, more fully featured,
ColdFire V2 RTOS port.
The Motorola ColdFire port was originally created by Jimmie Alam and Brian Birtles as a project while studying at
the Faculty of Engineering, University of Technology, Sydney. An edited version of their original report can be viewed here.
The report provides an excellent reference for those wishing to create new ports for different processors.
Since then, additional contributions were provided by Vladimir Lasky and most recently a big upgrade by Christian Walter.
I have not used the port myself, but Christian Walters work in upgrading the port and testing it with FreeRTOS V4.x.x adds great confidence in its
stability.
In addition to his work on the source code Christian Walters has kindly provided the documentation below. I would like to thank Christian for his
great contribution to FreeRTOS.org.
The documentation provided by Christian follows:
Coldfire MCF523x / GCC Port
[RTOS Ports]
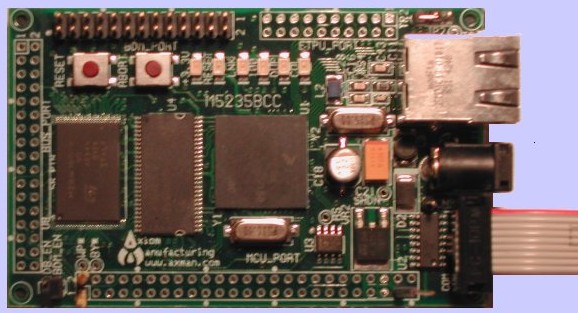
This page describes the FreeRTOS port for the Freescale/Motorola Coldfire range of microcontrollers. The demo application itself is targeted for the M5235BCC Business Card Computer which is a very cheap and powerful development platform. It contains a V2 Coldfire core with up to 150MHz, 16MB SDRAM, 2MB Flash and a 10/100 MBit Ethernet controller.
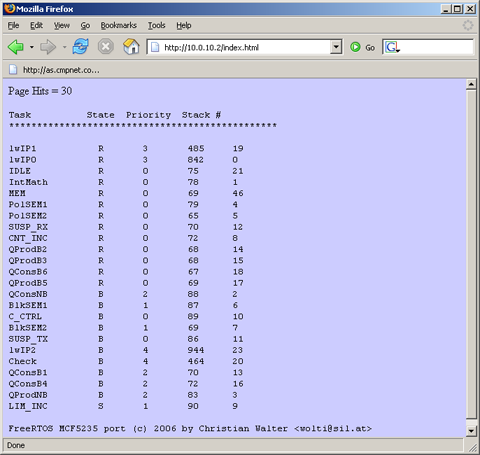
As downloaded this demo application includes a fully functional port of lwIP 1.1.1 for FreeRTOS together with a driver for the MCF523x ethernet interface. In addition it includes the typical functionality also found in the other FreeRTOS ports like an example of a serial driver and the demo tasks. The screen shot below shows the output which should be returned by the embedded HTTP server when a HTTP client connects to the target system.
IMPORTANT! Notes on using the Coldfire MCF523x RTOS port
Please read all the following points before using this Port.
- Source Code Organization
- The Demo Application
- Configuration and Usage Details
- Additional notes
- Credits
See also the FAQ My application does not run, what could be wrong?
The FreeRTOS download contains the source code for all the FreeRTOS ports and demonstrations and therefore contains many more files than required by this demo.
See the Source Code Organization section for a description of the downloaded files and information on creating a new project.
The port is rather big because it contains the lwIP TCP/IP protocol stack. If you don't need the stack you can use the bare port which can be found in FreeRTOS/Demo/MCF5235_GCC.
- FreeRTOS/Demo/lwip_MCF5235_GCC: Contains the demo application code. The file demo.c contains the startup code which creates the tasks and starts the RTOS scheduler. The web server and the lwIP initialization code is in web.c. In addition this directory includes Makefiles, linker scripts for GNU LD and GDB initialization scripts.
- FreeRTOS/Demo/lwip_MCF5235_GCC/include/arch: This directory contains the processor include files from the Freescale MCF5235 support page. Simply download the MCF523XSC package somewhere at the bottom of the page if you want to replace the supplied files.
- FreeRTOS/Demo/lwip_MCF5235_GCC/system: This directory includes system startup files. If your are not using an MCF5235 processor you will need to make some changes here. This includes crt0.S, init.c, vector.S and serial.c. The files mcf5xxx.S and newlib.c should work without modification.
- FreeRTOS/Demo/lwip_MCF5235_GCC/include: This directory contains processor specific includes. They where taken and imported from the Freescale website where they can be found with the keyword MCF523XSC. They should also be replaced by the ones matching your target system.
- FreeRTOS/Demo/lwip_MCF5235_GCC/lwip: This directory contains the lwIP protocol stack. The port uses lwIP 1.1.1 released on March 15, 2006.
- FreeRTOS/Demo/lwip_MCF5235_GCC/lwip/contrib/port/FreeRTOS/MCF5235: This is the lwIP port. The file sys_arch.c is FreeRTOS specific and does not need to be changed. In case of a different controller you should replace the network interface driver found in netif/fec.c
Requirements
To use the demo application without modifications you must at least have the following hardware and software packages:
- A 5235BCC Business Card Computer kit from Freescale.
- A P & E BDM Cable (If you have bought the 5235BCCKIT you already have this) connected to the parallel port of your computer.
- GNU C Compiler for the m68k-elf-gcc target installed in /opt/gcc-m68k. If you have a different location change the Makefile.
- The BDM tools for Linux or WIN32 with Coldfire patches applied. You can use the patches written by me which are available on the patches tab of the website. If you want a graphical debugger you should also apply the patches to insight. Otherwise edit the Makefile and change the INSIGHT variable to m68k-bdm-elf-gdb.
Make sure that your target hardware is working as expected. Do NOT continue until you have verified this step. You can test your configuration by executing bdmchk /dev/bdmcf0 or bdmchk /dev/bdmcf20 in case you have applied my patches for the debugger. The output should look like:
wolti@pcno-4:$ /opt/gcc-m68k/bin/bdm-chk /dev/bdmcf20
BDM Check for Coldfire processors.
Device: /dev/bdmcf20
trying kernel driver: /dev/bdmcf20
trying bdm server: localhost:/dev/bdmcf20
Driver Ver : 2.12
Processor  : Coldfire2
Interface  : P&E Coldfire
Target status: 0x2 -- NOT RESET, HALTED, NOT STOPPED, POWER ON, CONNECTED.
Register test,    1 of    1 :
   D00 : ........................................
   D01 : ........................................
...
01001054: FFFFFFFF
wolti@pcno-4:$
Build configuration
Two build configuration are provided. Configuration one resides in the target memory and should be used for debugging and uses the m5235-ram.ld linker script. The second configuration is for flash execution and uses the m5235-rom.ld linker script. You can change the configuration by editing the file Makefile. Make sure that you execute a make clean command after changing this setting. Then execute make all debug. After the build has completed the insight debugger should start up. Select Run/Download from the menu.
On starting Insight for the first time a configuration dialog will appear that allows you to select your target device. Make sure that you have entered the correct device names (the same name as the bdm-chk tool):
 Configuration dialogue. Configuration dialogue.
Once the upload completes, open the Insight console using the View menu, and type the GDB command execute. This is defined in the m5235.gdb script supplied with the port and sets up the program counter. Next type continue, the execution should stop at the temporary breakpoint in main. Again an image is supplied for demonstration purposes.
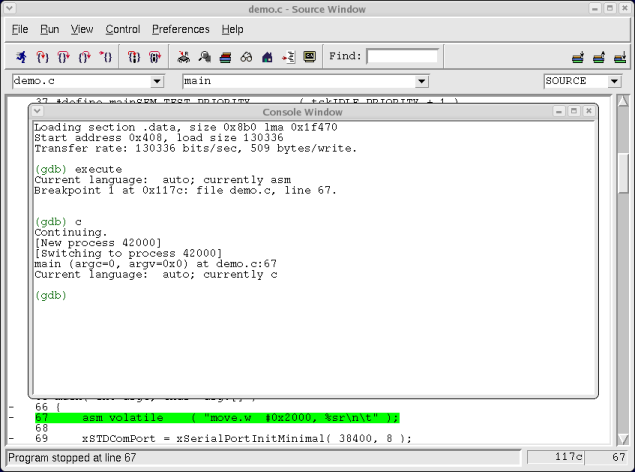 Entering the commands in the Insight console. Entering the commands in the Insight console.
If you prefer to work from the command line you can use GDB without Insight. The steps are illustrated below:
$ /opt/gcc-m68k/bin/m68k-bdm-elf-gdb --command=m5235.gdb --se=demo.elf
GNU gdb 6.0
Copyright 2003 Free Software Foundation, Inc.
GDB is free software, covered by the GNU General Public License, and you are
welcome to change it and/or distribute copies of it under certain conditions.
Type "show copying" to see the conditions.
There is absolutely no warranty for GDB.  Type "show warranty" for details.
This GDB was configured as "--host=i686-pc-linux-gnu --target=m68k-bdm-elf"...
(gdb) target bdm /dev/bdmcf20
trying kernel driver: /dev/bdmcf20
trying bdm server: localhost:/dev/bdmcf20
using coldfire 2 core
Remote bdm connected to /dev/bdmcf20
 Coldfire debug module version is 0 (5206(e)/5272/5282/5235)
(gdb) setup-and-load
(gdb) load demo.elf
Loading section .text, size 0x1f470 lma 0x0
Loading section .data, size 0x8b0 lma 0x1f470
Start address 0x408, load size 130336
Transfer rate: 130336 bits/sec, 509 bytes/write.
(gdb) execute
Current language:  auto; currently asm
Breakpoint 1 at 0x117c: file demo.c, line 67.
(gdb) c
Continuing.
[New process 42000]
[Switching to process 42000]
main (argc=0, argv=0x0) at demo.c:67
67          asm volatile    ( "move.w  #0x2000, %sr\n\t" );
Current language:  auto; currently c
(gdb)
Functionality
The demo application includes the following tasks:
- A set of the standard demo tasks
Including the polled queue, blocking queue, semaphore, math and dynamic priority tasks. See the RTOS demo pages for further information.
- A check task
The check task executes periodically. It monitors the standard demo tasks, writes a '.' to the terminal IO (via the print task) should all the tasks be executing without error, and 'E' should an error have been detected at any time.
- The lwIP tasks
There are multiple tasks running for lwIP. One belongs to lwIP itself which handles TCP/IP connections. Another one is used in the ethernet driver to handle received ethernet frames. It is unblocked by a semaphore signaled in the ISR. The third one belongs to the web server and processes HTTP requests.
The basic steps to get everything running is to check if the preemptive timer tick is working as expected. For this one should check that the function xPortStartScheduler is correct for the target architecture. I recommend setting a break point within the ISR or toggling a LED. In addition you should verify that the Coldfire uses the single stack model (not switch between USP and SSP) which is the default for this platform. Checking if the processor is in the supervisor mode before the RTOS scheduler is enabled is also a must. After these steps the MCF5235 port without lwIP should run without problems.
If you add lwIP I assume that you are familiar with it and have an ethernet driver ready. Simply copy these files into the correct directory and change the makefiles and you should be ready to go. As always make sure that the previous step is working correctly because at this level debugging OS or port related problems is rather difficult.
Thread-safe newlib (Hints)
To make newlib thread-safe we must allocate a new struct _reent for each task. This should be done in pxPortInitialiseStack. In addition one should modify the functions portSAVE_CONTEXT and portRESTORE_CONTEXT to replace the __impure_ptr with the task specific pointer. This feature is currently not in the port but the author will add it soon. For now, take a look at the article from Bill Gatliff Embedding GNU: Newlib, Part 2.
Coldfire stack layout and context switching
This section is only for people interested in the inner working of the Coldfire port. I will discuss the stack layout and the portSAVE_CONTEXT and portRESTORE_CONTEXT context macros as well as the portYIELD macros.
Whenever a context switch is performed the Coldfire CPU core will create an Exception Frame on the stack. Immediately after that the assembler functions defined in portSAVE_CONTEXT must be executed. They perform the following steps:
- Reserve space for the data registers %d0-%d7 and the address registers %a0-%a6 on the stack. This accounts for 60bytes. In addition the value of ulCriticalNesting must be pushed on the stack for the vPortEnterCritical and vPortExitCritical functions. These take four more bytes.
- After reserving the space the registers are pushed on the stack.
- Now the stack pointer is advanced 60bytes and the variable ulCriticalNesting is pushed on the stack.
- Next the value of the stack pointer is stored in the task control block pxCurrentTCB.
The assembler code can be found in portmacro.h. To help with debugging an example is shown below. Simply place a breakpoint in your timer ISR and compare with this example.
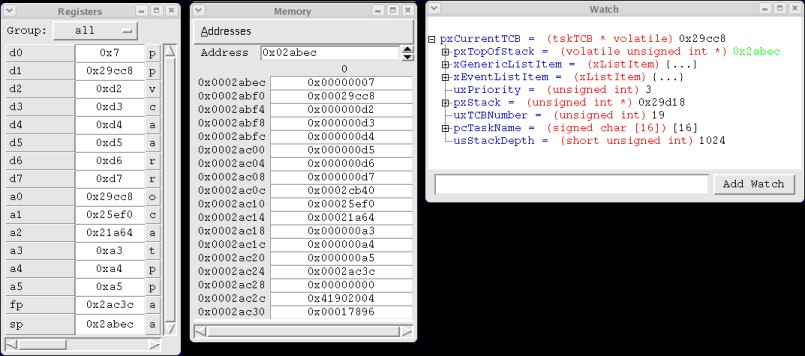 Stack frame Stack frame
What you can see here is that before the Exception the SP pointed to 0x002ac30 where we can now find the return address 0x00017896 as well as the exception frame and the processor status register 0x41902004. At address 0x002ac2c we store the value of ulCriticalNesting. The following registers are address and data registers. The new top of the stack 0x0002abec which is also stored in the associated TCB pxCurrentTCB.
Restoring the context is done by performing the following steps:
- Restore the top of the stack by dereferencing the pointer pxCurrentTCB and loading it in the stack pointer registers %sp.
- Next the data and address registers are reloaded and the stack pointer is incremented by 60bytes
- Now we restore the ulCriticalNesting counter and increment the stack pointer once. It now points to the Coldfire exception frame.
- Next the rte instruction is executed and task execution is continued.
Another very interesting feature of the Coldfire are software interrupts. The portYIELD macro is simply implemented by a trap which is initialized to the same function as the timer tick ISR.
Software using this port
Last but not least the author would like to link to some applications using this port.
- FreeModbus is a portable Modbus ASCII/RTU and TCP implementation and the Coldfire platform is a first class target.
Here is a list of people I am grateful to. They are listed in no particular order.
- Thanks a lot to Richard Barry for providing such an excellent operating system and support.
- Many thanks goes to my colleague P. Puffler who shared his knowledge with me.
- Thanks to Janusz Uzycki for reporting some bugs in the FreeRTOS/lwIP layer.
FreeRTOS port Copyright 2006 by Christian Walter <wolti @ sil.at>
$Id: portmcf5235.html,v 1.3 2006/09/24 22:50:22 wolti Exp $
|