FreeRTOS Cortus APS3 Demo
[RTOS Ports]
 The Digilent Spartan 3 Starter Board used during the port development The Digilent Spartan 3 Starter Board used during the port development
This page presents the FreeRTOS demo application for the Cortus APS3
processor. The demo is pre-configured to use:
- The low cost Spartan-3 Starter Board from Digilent.
- The Eclipse based Cortus IDE from Cortus.
- The GCC compiler, also from Cortus.
Instructions are provided below for:
- Creating the directory structure that the Eclipse managed make project expects to find
(this just involves running a batch file).
- Importing the project and debugger settings into an Eclipse workspace.
- Building the demo application.
- Debugging the demo application.
IMPORTANT! Notes on using the APS3 Demo
Please read all the following points before using this RTOS port.
- Source Code Organisation
- The Demo Application
- RTOS Configuration and Usage Details
See also the FAQ My application does not run, what could be wrong?
Source Code Organisation
The APS3 Eclipse project can be located in the FreeRTOS/Demo/CORTUS_APS3_GCC directory.
The FreeRTOS zip file download contains the files for all the ports and demo application projects. It therefore contains many more
files than used by this demo. See the Source Code Organization section for a description
of the downloaded files and information on creating a new project.
The Demo Application
Development environment
If you are using a new Cortus IDE installation then follow these next steps to
prepare the development environment:
- The file xstart-aps3-eval/fpga1000.mcs (provided by Cortus) must be programmed into the Spartan-3 PROM.
- .jtag_ini must be edited to configure the debug interface to use the appropriate cable, either USB or Parallel.
.jtag_ini can be accessed from the start menu once the Cortus and Digilent tools have been installed.
- dpcutil.dll must be copied from the Windows System32 directory into the cortus-ide/toolchain/bin directory.
Make sure to backup the existing dpcutil.dll file first!.
Creating the necessary directory structure
The demo application is built using an Eclipse managed make project. By default
managed make projects expect to find all the source files necessary to complete
the build within the same directory tree as the project file itself. However, the
standard FreeRTOS directory structure keeps the core RTOS kernel source files separate
from the demo application source and project files, meaning a managed make project
cannot be used without first having to perform a few relatively complex configuration
steps. To avoid this complexity a batch file is provided to copy all the required
RTOS kernel files from their default locations to the APS3 project directory. The
batch file is called CreateProjectDirectoryStructure.bat and is located
in the FreeRTOS/Demo/CORTUS_APS3_GCC directory.
CreateProjectDirectoryStructure.bat must be executed before the
demo application project is imported into an Eclipse workspace. The batch file
has to be executed from the command line, rather than from within Eclipse itself.
Remember that the project will then be using the RTOS kernel source files from the Demo/CORTUS_APS3_GCC
directory, and not from the normal FreeRTOS/Source directory.
Importing the demo project into an Eclipse workspace
- Start Cortus Eclipse. As it starts up you will be prompted for a workspace location. You can use your existing workspace or create a new one in a
convenient location.
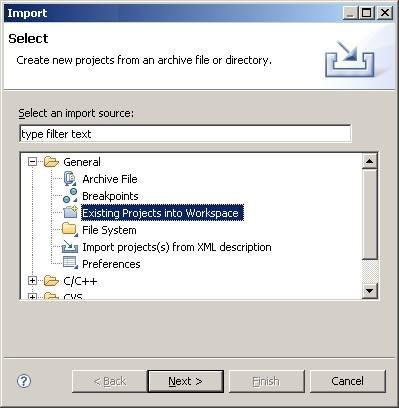
- Within the Eclipse IDE, select 'Import...' from the 'File' menu.
- A dialog box will appear. Select 'Existing Projects Into Workspace', then click 'Next' (see the image to the right).
- Browse to and select the FreeRTOS/Demo/CORTUS_APS3_GCC directory to complete the import process. Take care that the
'Copy projects into workspace' check box is NOT checked during this last step.
Importing the debugger configuration into an Eclipse workspace
- Within the same Eclipse workspace, select 'Import...' from the 'File' menu again.
- A dialog box will appear. Select 'Existing Projects Into Workspace' as before, then click 'Next'.
- This time select the 'Select Archive File' radio button, then browse to and select the FreeRTOS/Demo/CORTUS_APS3_GCC/BSP_ProjectForDebugging.zip zip file to complete the import process.
Importing the FreeRTOS project into the Red Suite workspace
Hardware set up
The demo includes the standard 'ComTest' tasks where one task transmits characters
on a UART that are then received by another task. An error is latched if any characters
are missed or received out of sequence. A loopback connector must be fitted to
the UART for the mechanism to work - simply connect the UART Rx pin to
the UART Tx pin (connect pins 2 and 3 on the UART connector J2, a paper clip is
normally sufficient).
Building and executing the demo application
- First, complete the steps detailed above to set up the development environment, and import both the demo application and debugger setting projects into
your Eclipse workspace.
- Select 'Build All' from the Eclipse 'Build' menu. The project should build without generating any errors.
- A GDB server is required for Eclipse to communicate with the hardware. This can be started using the 'Run GDB server' link
from the 'Cortus Eclipse IDE' start menu item. Note this is on the Windows start menu, not within the Eclipse IDE.
- Select 'Debug Configurations...' from the Eclipse 'Run' menu. A dialogue box will appear
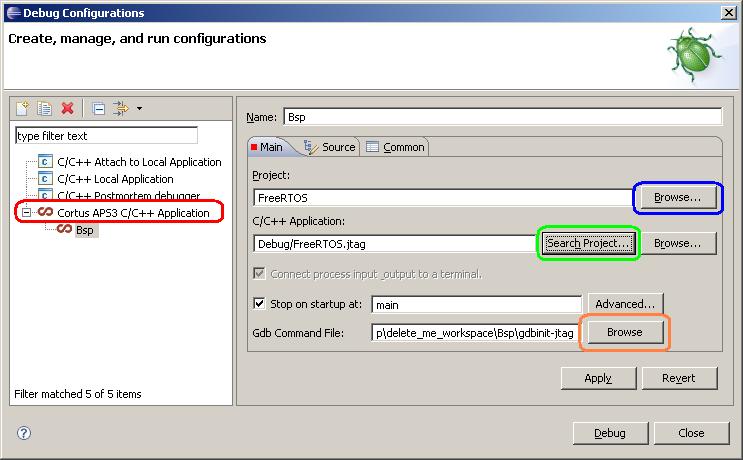 Setting up the debug configuration Setting up the debug configuration
- In the dialogue box, first double click 'Cortus APS3 C/C++ Application' to generate a new debug configuration. This is highlighted
in red in the image above. Then use the buttons highlighted in blue and green in the image above to set the project and application
to debug respectfully. Finally use the button highlighted in orange in the image above to set the GDB command script to 'gdbinit-jtag'.
- Click Debug to close the dialogue box and start the debug session. It can take several seconds for a debug session to start.
Demo functionality
main() creates 29 tasks before starting the RTOS scheduler. These consist
mainly of the standard demo tasks (see the demo application
section for details of the individual tasks). They exist to demonstrate how the FreeRTOS API can be used and test the
FreeRTOS port only, and contain no application specific useful functionality.
The following tasks and tests are created in addition to the standard demo tasks:
- Check task
The check task is included to provide visual feedback of the system status.
It periodically queries all the standard demo tasks before toggling user LED
LD7. If user LED LD7 is toggling every three seconds then the check task has
not discovered any errors. If the toggle rate increases to every 500ms then
an error has been discovered in at least one task. This mechanism can be
tested by removing the loopback connector from the UART, and in so doing
deliberately creating an error condition.
- RegTest tasks
These are test tasks that check the context switch mechanism.
Each task fills the microcontroller registers with known values, with each
task using a different set of values. They then
continuously loop around testing that each register still contains its
expected value. An error is flagged if an unexpected value is found in any
register at any time.
- Display tasks
One of the display tasks counts down from 9999 to 0, the other periodically
writes "APS3" to the display.
When executing correctly the demo application will exhibit the following behaviour:
- LEDs LD0 to LD1 are under the control of the standard 'flash' tasks. Each
will toggle at a fixed but different frequency.
- LED LD7 is under the control of the 'check' task. It will toggle every
three seconds while all the other tasks in the system are executing without
error. The toggle rate will increase to 500ms if any error are reported.
- The display will count down from 9999 to zero, before wrapping back around
to 9999. The counting will be periodically interrupted by "APS3" being
displayed for a few seconds.
RTOS port specific configuration
Configuration items specific to this demo are contained in FreeRTOS/Demo/CORTUS_APS3_GCC/Demo/FreeRTOSConfig.h. The
constants defined in this file can be edited to suit your application. In particular, configTICK_RATE_HZ which sets the frequency of the RTOS tick.
The default value of 1000 is useful for testing the RTOS port but is faster than most application require. Reducing this value will improve the
port efficiency.
Note: FreeRTOSConfig.h contains an implementation of the traceTASK_SWITCHED_IN() macro.
The implementation is used by one of the RegTest tasks to determine if the test
task is switched out at the appropriate times. The implementation is only for
use by this test and is not required by the RTOS kernel itself. Removing the macro
from FreeRTOSConfig.h (just
deleteing the entire traceTASK_SWITCHED_IN() macro) will improve context switch
performance, but will cause the RegTest task to falsly signal an error.
Each port #defines 'BaseType_t' to equal the most efficient data type for that processor. This port defines
BaseType_t to be of type long.
Note that vPortEndScheduler() has not been implemented.
Interrupt service routines
Interrupt service routines can use any API function that ends in 'FromISR', but
to do so must be written in compliance with the following few rules:
- The interrupt must be configured to use interrupt priority 0.
- The interrupt entry point must be a function that is qualified with the
"naked" attribute. This is the interrupt wrapper.
- The naked function must first call portSAVE_CONTEXT(), then call a C
handler function that is qualified with the "noinline" attribute, before calling
portRESTORE_CONTEXT() and exiting.
Following is an example to demonstrate these rules in practice. This example implements
a very simplistic UART Rx interrupt. Please note that this is written purely for
demonstration purposes and it not intended to represent an efficient implementation!
/* UART Rx interrupt entry point is a function that is qualified with the
naked attribute. */
void interrupt6_handler( void ) __attribute__((naked));

void interrupt6_handler( void )
{
    /* The first line must be a call to portSAVE_CONTEXT(). */
    portSAVE_CONTEXT();

    /* The actual interrupt processing should be in a separate C function, which
    is defined using the "noinline" attribute to ensure it works at all
    optimisation levels. */
    prvRxHandler();

    /* The last line must be a call to portRESTORE_CONTEXT().  It might be that
    the interrupt saves the context of one task, but restores the context of
    another. */
    portRESTORE_CONTEXT();
}
An example interrupt entry point
/* The actual interrupt processing should be placed in a separate C function that
is qualified with the noinline attribute. */
static void prvRxHandler( void ) __attribute__((noinline));

static void prvRxHandler( void )
{
signed char cChar;
BaseType_t xHigherPriorityTaskWoken = pdFALSE;

    /* A character has been received, capture the character from the UART. */
    cChar = uart1->rx_data;

    /* Send the character to a queue for processing at the task level.
    xQueueSendFromISR() will set xHigherPriorityTaskWoken to pdTRUE if a task
    was blocked on the queue waiting for data to arrive, and the task that was
    blocked has a priority that is greater than or equal to the currently
    executing task. */
    xQueueSendFromISR( xRxedChars, &cChar, &xHigherPriorityTaskWoken );

    /* This will cause a new task to be selected as the Running state task if
    xHigherPriorityTaskWoken is not pdFALSE. */
    portYIELD_FROM_ISR( xHigherPriorityTaskWoken );
}
An example C interrupt handler function, which is called by the wrapper
Switching between the pre-emptive and co-operative RTOS kernels
Set the definition configUSE_PREEMPTION within FreeRTOS/Demo/CORTUS_APS3_GCC/Demo/FreeRTOSConfig.h to 1 to use pre-emption or 0
to use co-operative.
Compiler options
As with all the ports, it is essential that the correct compiler options are used. The best way to ensure this is to base your
application on the provided demo application files.
Memory allocation
Source/Portable/MemMang/heap_2.c is included in the Cortus demo application project to provide the memory
allocation required by the RTOS kernel.
Please refer to the Memory Management section of the API documentation for
full information.
Copyright (C) Amazon Web Services, Inc. or its affiliates. All rights reserved.
|