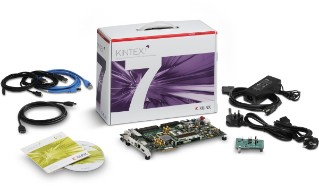
This MicroBlaze demo was produced using Xilinx's Vivado Design Suite, supports version 8.x of the MicroBlaze soft processor core, and was developed and tested on a Kintex FPGA on a KC705 Evaluation Kit board.
The demo includes an embedded web server implementation that uses version 1.4.0 of the lwIP TCP/IP stack. The web server's server side include (SSI) functionality is used to serve pages that include dynamic task and run-time statistic information. Currently both FreeRTOS and lwIP are built as part of the application (rather than part of the BSP).
The directory structure used by the demo application is shown and described
below. The root MicroBlaze_Kintex7_EthernetLite directory is itself
located in /FreeRTOS/Demo.
MicroBlaze_Kintex7_EthernetLite
    |
    +-RTOSDemo  Contains the SDK project and C files specific to the demo.
    |
    +-BSP       Contains the hardware BSP.
    |
    +-Hardware  Contains the hardware description.
Note:
The RTOSDemo directory only contains the source files that are specific
to the KC705 MicroBlaze demo. The RTOS source files, lwIP source files,
CLI source files, and the source files that
implement tasks that are common to all demo applications, are located
elsewhere in the directory tree.
The project may not build if the default directory structure
has been changed - including the /FreeRTOS-Plus directory (which contains
the CLI source files).
Also see the page that describes how to use virtual and linked paths in the Eclipse project explorer.
main_blinky() creates a basic starter demo that creates two tasks and one queue. One task uses the queue to periodically send the value 100 to the other task. The receiving task toggles an LED each time the message is received. The message is sent every 200 milliseconds, so the LED toggles every 200 milliseconds.
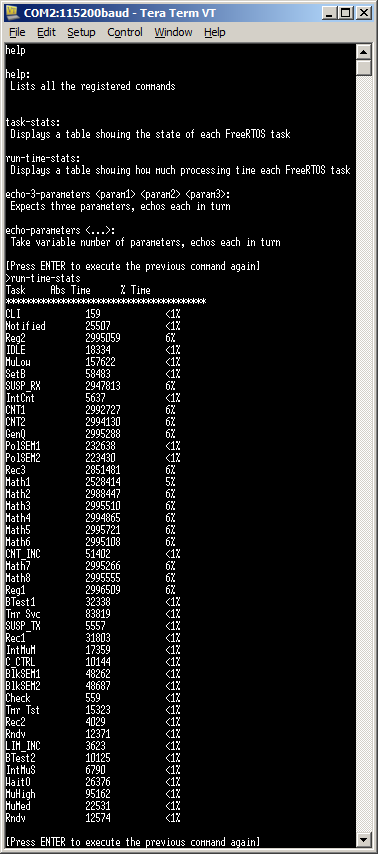
The majority of tasks created by the comprehensive demo are from the set of standard demo tasks. These are used by all FreeRTOS demo applications, and have no specific functionality or purpose other than to demonstrate the FreeRTOS API being used, and test the RTOS port.
The following tasks are created in addition to the standard demo tasks:
These tasks test the RTOS kernel context switch mechanism by filling each MicroBlaze register with a known unique value, then repeatedly checking that the value originally written to the register is maintained for the lifetime of the task. The tasks execute at the idle priority, so are preempted regularly. The nature of these tasks necessitates that they are written in assembly.
The check task periodically queries the standard demo tasks and the register test tasks to ensure they are functioning as expected. The check task also toggles LED 7 to give a visual indication of the system status. If LED 7 toggles every 3 seconds then the check task has not found any problems with the demo. If LED 7 toggles every 200 milliseconds then the check task has discovered a [potential] problem in at least one task..
The lwIP example is configured to use a static IP address. The static IP address is set by the constants configIP_ADDR0 to configIP_ADDR3 at the bottom of FreeRTOSConfig.h. Constants used to define a netmask are also located at the bottom of FreeRTOSConfig.h. The selected IP address and netmask must be compatible with the network to which the MicroBlaze target is being connected. This can normally be achieved by setting the first three octects of the target's IP address and netmask to match the first three octects of the host computer's IP address and netmask respectively. The chosen IP address must be unique on the network.
A cross over (point to point) Ethernet cable must be used if the target and host systems are connected directly (without going through a hub or switch). A standard Ethernet cable must be used if the target and host systems are connected through a hub or switch.
When connected correctly the demo uses the lwIP sockets API to create a FreeRTOS+CLI command console, and the lwIP raw API to create a basic HTTP web server. Server side includes (SSI) are used to generate dynamic data in the served web pages. To connect to the http server simply type the IP address of the target into the address bar of a web browser.
To connect to FreeRTOS+CLI, open a command prompt and enter "telnet <ipaddr>" where <ipaddr> is the IP address of the target. Once connected type "help" to see a list of registered commands. Note this example does not implement a real telnet server, it just uses the telnet port number to allow easy connection using telnet tools.
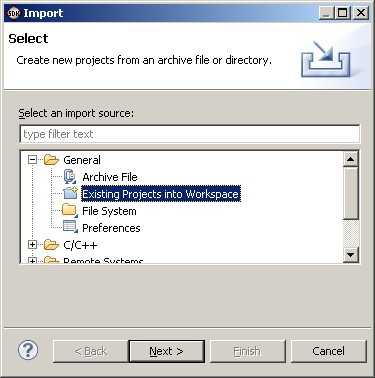
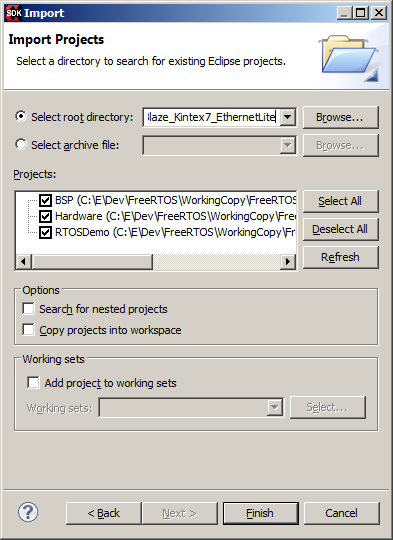
The Hardware and BSP projects are dependencies of the RTOSDemo project, so only the RTOSDemo project needs to be built explicitly.
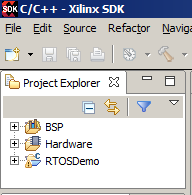
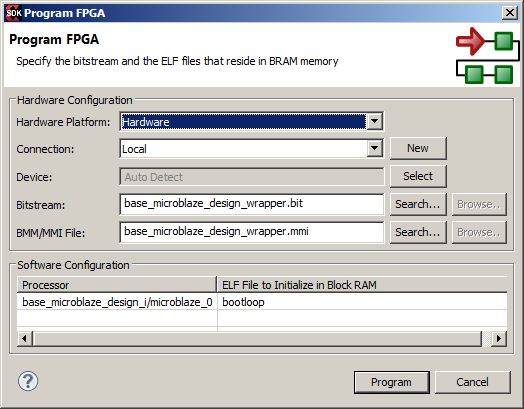
Programming the Kintex FPGA
The Kintex FPGA must be programmed before the application can be downloaded to
the MicroBlaze softcore microcontroller. This step only needs to be performed
once on each power cycle.
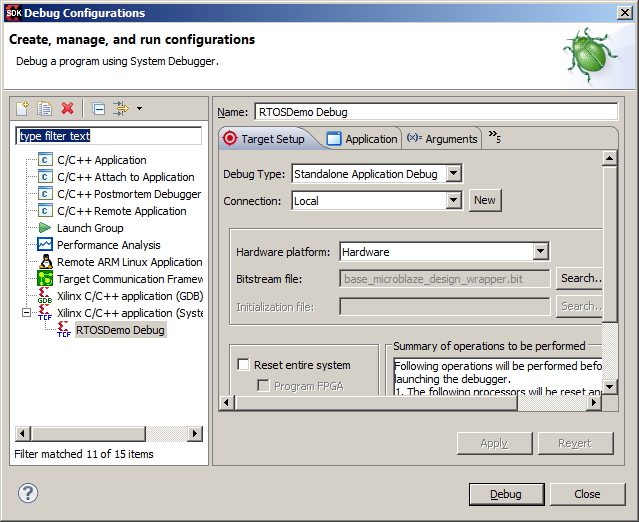
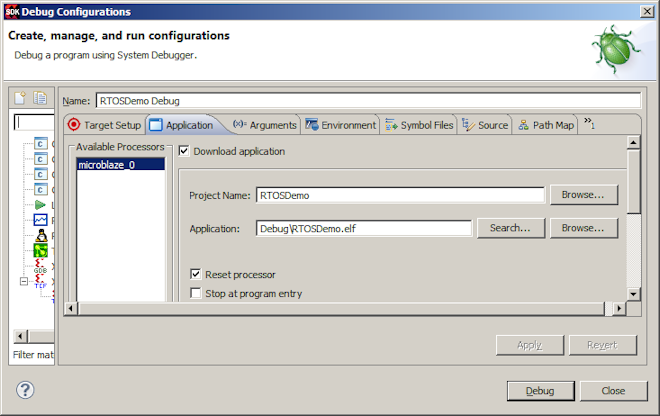
All the other tabs in the 'Debug Configurations' dialogue can be left
with their default settings.
Callback functions that must be supplied by the application
This is an application defined callback function used to install the tick interrupt handler. It is provided as an application callback, rather than being an integral part of the RTOS kernel port layer, because the RTOS kernel will run on lots of different MicroBlaze and FPGA configurations - not all of which will have the same timer peripherals defined or available.
vApplicationSetupTimerInterrupt() must install the RTOS kernel defined function vPortTickISR() as the tick interrupt handler.
The official demo application includes an example implementation of vApplicationSetupTimerInterrupt() in main.c. The example implementation uses the a Xilinx Timer/Counter as the tick interrupt source. If this peripheral is available on your hardware platform, then the example implementation can be used without modification.
This is an application defined callback function used to clear whichever interrupt was installed by the vApplicationSetupTimerInterrupt() callback function. It is provided as an application callback because the RTOS kernel will run on lots of different MicroBlaze and FPGA configurations - not all of which will have the same timer peripherals defined or available.
The official demo application includes an example implementation of vApplicationClearTimerInterrupt() in main.c. The example implementation complements the example implementation of vApplicationSetupTimerInterrupt() found in the same files by clearing the interrupt generated by the Xilinx Timer/Counter peripheral. If your application does not modify the provided example implementation of vApplicationSetupTimerInterrupt(), then the provided example implementation of vApplicationClearTimerInterrupt() can also be used without any modification.
Implementing an interrupt service routines (ISR)
Functions that implement ISRs are normal C functions, but must conform to the following
prototype.
void ISRFunctionName( void *ISRParameter );
Context switching from an ISR
It is common for an ISR to cause a task to leave the Blocked
state. For example, consider the case where a task processes data that arrives
on a queue. When the queue is empty, there is no data to process, and the task
might opt to enter the Blocked state to wait for more data to become available.
If an ISR then sends data to the queue, the task would
automatically leave the Blocked state as the queue would no longer be empty.
If an ISR causes a task to leave the Blocked state, and the task that leaves the Blocked state has a priority that is higher than or equal to the currently executing task (the task that was interrupted), then a context switch should be performed in the ISR to ensure the ISR returns directly to the newly unblocked, higher priority task. The ISR will have interrupted one task, but returned to another.
The macro portYIELD_FROM_ISR() is an interrupt safe version of taskYIELD(). It takes a single parameter that, if none zero, will indirectly cause a context switch to occur. Below is an example use of portYIELD_FROM_ISR(), which is taken from the file serial.c in the official demo application:
/* Note that this function is called from the UART interrupt handler, it is not
itself an interrupt handler, so its prototype does not have to match that
required by all interrupt handlers. */
static void prvRxHandler( void *pvUnused, UBaseType_t uxByteCount )
{
signed char cRxedChar;
BaseType_t xHigherPriorityTaskWoken = pdFALSE;

    /* While there are characters to process. */
    while( XUartLite_IsReceiveEmpty( xUartLiteInstance.RegBaseAddress ) == pdFALSE )
    {
        /* Obtain the next character. */
        cRxedChar = XUartLite_ReadReg( xUartLiteInstance.RegBaseAddress,
                                       XUL_RX_FIFO_OFFSET);

        /* Place the received character in the received queue.  If writing to the
        queue causes a task to leave the Blocked state, and the task has a
        priority equal to or above the priority of the interrupted task, then
        xHigherPriorityTaskWoken will automatically get set to pdTRUE inside the
        xQueueSendFromISR() function itself. */
        xQueueSendFromISR( xRxedChars, &cRxedChar, &xHigherPriorityTaskWoken );
    }

    /* Call portYIELD_FROM_ISR(), passing in xHigherPriorityTaskWoken.  If
    xHigherPriorityTaskWoken was set to pdTRUE inside xQueueSendFromISR(), then
    calling portYIELD_FROM_ISR() here will cause the ISR
    to return directly to the newly unblocked task.  If xHigherPriorityTaskWoken
    has retained its initialised value of pdFALSE, then calling
    portYIELD_FROM_ISR() here will have no effect. */
    portYIELD_FROM_ISR( xHigherPriorityTaskWoken );
}
Installing and enabling an ISR
The following functions are provided for installing, enabling and disabling
interrupts (in the interrupt controller) respectively. The Xilinx BSP library
functions that have similar functionality must not be used.
An example of how to use these functions is contained in the implementation of vApplicationSetupTimerInterrupt(), which is contained in main.c.
/*
 * Installs pxHandler as the interrupt handler for the peripheral specified by
 * the ucInterruptID parameter.
 *
 * ucInterruptID:
 *
 * The ID of the peripheral that will have pxHandler assigned as its interrupt
 * handler.  Peripheral IDs are defined in the xparameters.h header file, which
 * is itself part of the BSP project.  For example, in the official demo
 * application for this port, xparameters.h defines the following IDs for the
 * three possible interrupt sources:
 *
 * XPAR_INTC_0_TMRCTR_0_VEC_ID   - for the Xilinx timer
 * XPAR_INTC_0_UARTLITE_0_VEC_ID - for the UART
 * XPAR_INTC_0_EMACLITE_0_VEC_ID - for the Ethernet controller
 *
 *
 * pxHandler:
 *
 * A pointer to the interrupt handler function itself.  This must be a void
 * function that takes a (void *) parameter.
 *
 *
 * pvCallBackRef:
 *
 * The parameter passed into the handler function.  In many cases this will not
 * be used and can be NULL.  Some times it is used to pass in a reference to
 * the peripheral instance variable, so it can be accessed from inside the
 * handler function.
 *
 *
 * pdPASS is returned if the function executes successfully.  Any other value
 * being returned indicates that the function did not execute correctly.
 */
BaseType_t xPortInstallInterruptHandler( unsigned char ucInterruptID,
                           XInterruptHandler pxHandler, void *pvCallBackRef );


/*
 * Enables the interrupt, within the interrupt controller, for the peripheral
 * specified by the ucInterruptID parameter.
 *
 * ucInterruptID:
 *
 * The ID of the peripheral that will have its interrupt enabled in the
 * interrupt controller.  Peripheral IDs are defined in the xparameters.h header
 * file, which is itself part of the BSP project.  For example, in the official
 * demo application for this port, xparameters.h defines the following IDs for
 * the three possible interrupt sources:
 *
 * XPAR_INTC_0_TMRCTR_0_VEC_ID   - for the Xilinx timer
 * XPAR_INTC_0_UARTLITE_0_VEC_ID - for the UART
 * XPAR_INTC_0_EMACLITE_0_VEC_ID - for the Ethernet controller
 *
 */
void vPortEnableInterrupt( unsigned char ucInterruptID );

/*
 * Disables the interrupt, within the interrupt controller, for the peripheral
 * specified by the ucInterruptID parameter.
 *
 * ucInterruptID:
 *
 * The ID of the peripheral that will have its interrupt disabled in the
 * interrupt controller.  Peripheral IDs are defined in the xparameters.h header
 * file, which is itself part of the BSP project.  For example, in the official
 * demo application for this port, xparameters.h defines the following IDs for
 * the three possible interrupt sources:
 *
 * XPAR_INTC_0_TMRCTR_0_VEC_ID   - for the Xilinx timer
 * XPAR_INTC_0_UARTLITE_0_VEC_ID - for the UART
 * XPAR_INTC_0_EMACLITE_0_VEC_ID - for the Ethernet controller
 *
 */
void vPortDisableInterrupt( unsigned char ucInterruptID );
Exception handling (for advanced users only)
To enable FreeRTOS exception handling, first the MicroBlaze itself must be
configured to include exception handling functionality, and second
configINSTALL_EXCEPTION_HANDLERS must be set to 1 in FreeRTOSConfig.h.
Setting configINSTALL_EXCEPTION_HANDLERS to 1 will cause both the code and
data space consumed by the RTOS kernel to increase.
The following functions are provided to install the FreeRTOS exception handler, and process an exception when it occurs, respectively. The functionality of the FreeRTOS exception handler itself is described in the comments above the function prototypes found in portmacro.h, and replicated below.
An example implementation of vApplicationExceptionRegisterDump() is provided in both main-full.c and main-blinky.c.
/*
 * vPortExceptionsInstallHandlers() is only available when the MicroBlaze
 * is configured to include exception functionality, and
 * configINSTALL_EXCEPTION_HANDLERS is set to 1 in FreeRTOSConfig.h.
 *
 * vPortExceptionsInstallHandlers() installs the FreeRTOS exception handler
 * for every possible exception cause.
 *
 * vPortExceptionsInstallHandlers() can be called explicitly from application
 * code.  After that is done, the default FreeRTOS exception handler that will
 * have been installed can be replaced for any specific exception cause by using
 * the standard Xilinx library function microblaze_register_exception_handler().
 *
 * If vPortExceptionsInstallHandlers() is not called explicitly by the
 * application, it will be called automatically by the RTOS kernel the first time
 * xPortInstallInterruptHandler() is called.  At that time, any exception
 * handlers that may have already been installed will be replaced.
 *
 * See the description of vApplicationExceptionRegisterDump() for information
 * on the processing performed by the FreeRTOS exception handler.
 */
void vPortExceptionsInstallHandlers( void );

/*
 * The FreeRTOS exception handler fills an xPortRegisterDump structure (defined
 * in portmacro.h) with the MicroBlaze context, as it was at the time the
 * exception occurred.  The exception handler then calls
 * vApplicationExceptionRegisterDump(), passing in a reference to the completed
 * xPortRegisterDump structure as its parameter.
 *
 * The FreeRTOS kernel provides its own implementation of
 * vApplicationExceptionRegisterDump(), but the RTOS kernel provided implementation
 * is declared as being 'weak'.  The weak definition allows the application
 * writer to provide their own implementation, should they wish to use the
 * register dump information.  For example, an implementation could be provided
 * that writes the register dump data to a display, or a UART port.
 */
void vApplicationExceptionRegisterDump( xPortRegisterDump *xRegisterDump );
RTOS port specific configuration
The RTOS kernel and demo behaviour can be customised using the configuration constants
contained in the file FreeRTOS/Demo/MicroBlaze_Kintex7_EthernetLite/RTOSDemo/src/FreeRTOSConfig.h.
The majority these configuration constants are used for all FreeRTOS ports, and are
described on the Customisation
page of this web site, and in the FreeRTOS Reference Manual.
The following constants are specific to this port:
/* If configINSTALL_EXCEPTION_HANDLERS is set to 1, then the RTOS kernel will
automatically install its own exception handlers before the RTOS kernel is started,
if the application writer has not already caused them to be installed using the
vPortExceptionsInstallHandlers() API function.  vPortExceptionsInstallHandlers()
is described on this web page. */
#define configINSTALL_EXCEPTION_HANDLERS 1

/* configINTERRUPT_CONTROLLER_TO_USE must be set to the ID of the interrupt
controller that is going to be used directly by FreeRTOS itself.  Most hardware
designs will only include on interrupt controller, so can use the same setting
as shown here.  XPAR_INTC_SINGLE_DEVICE_ID is itself defined in the xparameters.h
header file, which is part of the Xilinx BSP library project. */
#define configINTERRUPT_CONTROLLER_TO_USE XPAR_INTC_SINGLE_DEVICE_ID