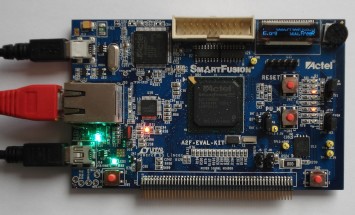
SmartFusion A2F-EVAL-KIT Evaluation Kit
This page documents a FreeRTOS ARM Cortex-M3 demo application that targets the Microsemi (formally Actel)
SmartFusion mixed signal FPGA with integrated ARM Cortex-M3 microcontroller.
FreeRTOS includes ARM Cortex-M3 ports for the GCC, Keil and IAR compilers. Demo application projects targeting the A2F200M3 SmartFusion are provided for the SoftConsole (Eclipse), IAR Embedded Workbench, and Keil MDK IDEs . This page provides instruction on using the GCC / SoftConsole IDE only. A separate page provides instructions on using the IAR and Keil IDEs.
The SoftConsole project is configured to run on the A2F-EVAL-KIT SmartFusion evaluation board.
An example embedded web server implementation is included. This makes use of a modified version of the tiny uIP TCP/IP stack. Code-named FreeTCPIP, the modifications to the TCP/IP stack allow a higher throughput than can be achieved with the original code. Dynamic web pages showing RTOS, TCP/IP and task run time statistics are created and served using the standard uIP CGI scripting facility.
uIP was originally written by Adam Dunkels. It is open source, but licensed separately from FreeRTOS. Users must familiarise themselves with the uIP licence, which is detailed at the top of each uIP source file.
See also the FAQ My application does not run, what could be wrong?
The SoftConsole project file for the SmartFusion A2F200M demo is located in the FreeRTOS/Demo/CORTEX_A2F200_SoftConsole directory. This is the project that should be imported into the SoftConsole workspace. The Preparing the Eclipse Project section below contains important information on setting up the demo project directory, and importing the demo project into SoftConsole.
Preparing the SoftConsole (Eclipse) project directory
Eclipse projects can be either standard makefile projects, or managed make projects.
The SmartFusion SoftConsole project uses a managed make project. This in turn means that
either:
CreateProjectDirectoryStructure.bat must be executed before the SoftConsole project is imported into the Eclipse workspace.
CreateProjectDirectoryStructure.bat cannot be executed from within the SoftConsole Eclipse IDE.
| Build configuration | Description |
| Blinky |
This is a very simple example. It creates two tasks,
one software timer, and also uses a button interrupt.
The two tasks communicate via a queue - the queue send task, and the queue receive task. The queue receive task toggles an LED each time it receives a value. Pressing user button SW1 generates an interrupt, the ISR for the interrupt resets a software timer before turning an LED on. The software timer has a five second period, and when the five seconds has expired, the software timer callback function turns the LED off again. Therefore, pressing SW1 will turn the LED on, and the LED will remain on until a full five seconds pass without the button being pressed again. The Blinky build configuration uses the main-blinky.c source file. The other two build configurations use the main-full.c source file.
|
| Full |
This is a comprehensive demo that creates lots of tasks,
queues, semaphores (of various types) and software timers.
The Full build configuration creates the same tasks and timers that are created by the Blinky build configuration. In addition to these, the Full build configuration also creates a lot of tasks from the set of standard demo tasks. The standard demo tasks don't perform any particular function. Their purpose is firstly to test the FreeRTOS port, and secondly to provide examples of how to use the FreeRTOS API functions. Further, the Full build configuration creates yet more tasks that are neither part of the Blinky configuration, or the set of standard demo tasks. These additional tasks are described briefly below this table.
|
| Full_with_optimisation |
The functionality of the Full_with_optimisation build configuration
is identical to that of the Full build configuration. Full_with_optimisation
has compiler optimisation set high. Full has compiler optimisation
off. That is the only difference between the two.
|
Tasks and timers that are created by both the Full and Full_with_optimisation
build configurations, that are not part of either the Blinky demo, or the standard
demo tasks, include:
Each time the check timer expires, its associated callback function queries the status of all the running standard demo tasks. If any queried status is returned as 'failed', then the period of the Check timer is shortened to 500ms, from its original setting of 3 seconds.
The callback function assigned to the check timer toggles LED D8 each time it executes. Therefore, if LED D8 is toggling every three seconds, then no errors have been reported. If LED D8 is toggling every 500ms, then at least one standard demo task has reported an error. The name of the standard demo task that reported the error can be viewed using the embedded web server - it is displayed at the bottom of the "task stats" web page, under the task stats table.
All TCP/IP related processing is contained in the uIP task. The Flash and RAM footprint of the TCP/IP stack is extremely small compared to other embedded TCP/IP implementations.
The OLED task scrolls a message across both of the two OLED rows.
The IP addresses used by the web server running on the SmartFusion device, and the web browser used to connect to the web server, must be compatible with each other. To ensure this is the case, make the first three octets of both IP addresses the same. For example, if the web browser computer uses IP address 192.168.0.1, then the SmartFusion device can be given any IP address in the range 192.168.0.2 to 192.168.0.254 - other than any IP addresses that is already present on the same network.
The MAC address assigned to the SmartFusion device must be unique on the network to which the device is being connected.
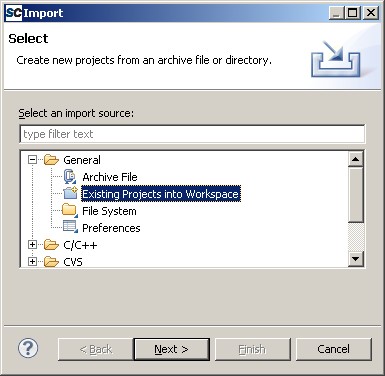
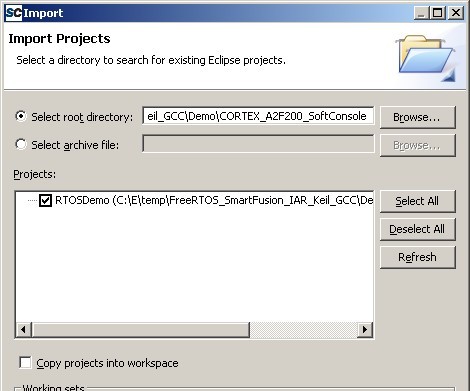
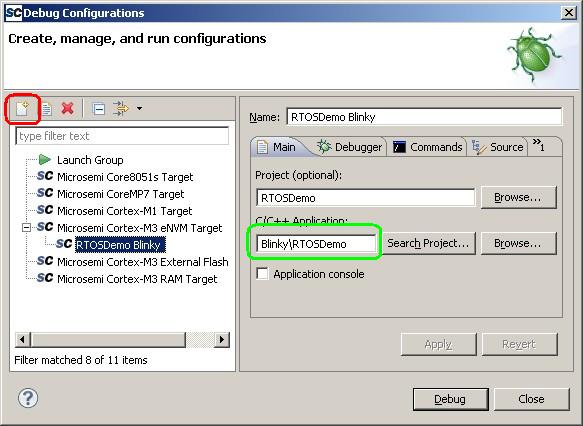
Creating a debug configuration
When executing correctly, the demo application will behave as follows:
The "IO" page also displays the raw reading of the analogue input port connected to the potentiometer marked 50K_POT (mounted next to the OLED on the development board).
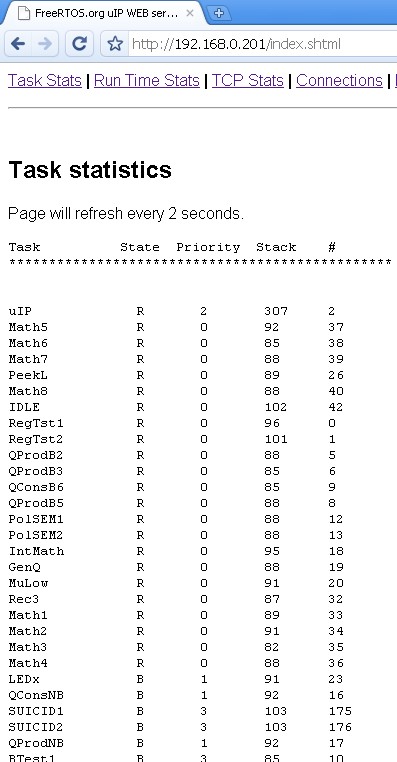
The RTOS stats page served by the SmartFusion web server
showing status information on each task in the system.
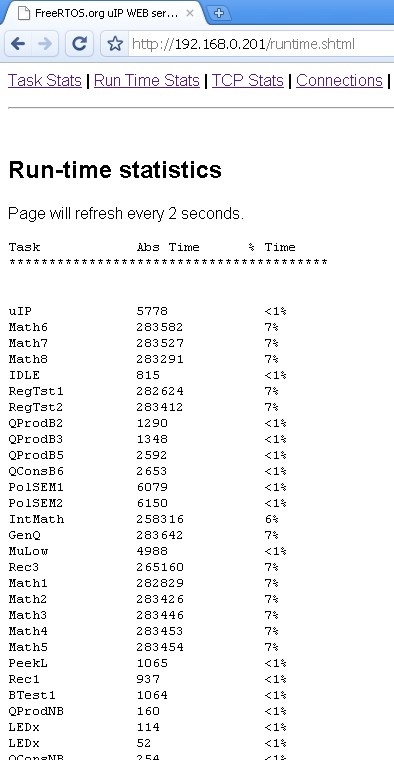
The run time stats page served by the SmartFusion web
server showing the processor utilisation of each task.
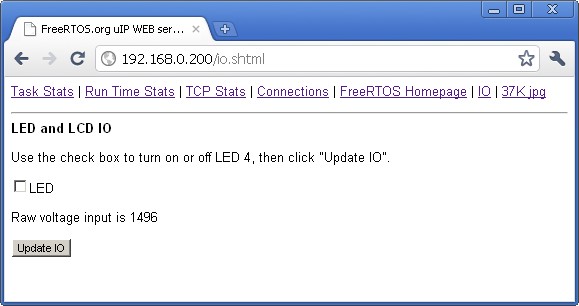
The served IO page
The IO page provides a simple interface to permit two LEDs to be turned on and off from a web browser. It also displays the current raw analogue input reading from the 50K potentiometer that is located next to the OLED on the evaluation board. Changes are sent to the target board whenever the "Update IO" button is clicked. Values displayed on the IO page are updated each time the "Update IO" button is clicked, or the served web page is refreshed.
Other served pages include TCP/IP statistics, and a large JPG image. All the web pages are included in the downloaded binary image - which can make the binary image appear to be quite large (the jpg file by itself is in excess of 36K).
This sets the frequency of the RTOS tick interrupt. The supplied value of 1000Hz is useful for testing the RTOS kernel functionality but is faster than most applications require. Lowering this value will improve efficiency.
See the RTOS kernel configuration documentation for full information on these configuration constants.
Attention please!: Remember that ARM Cortex-M3 cores use numerically low priority numbers to represent HIGH priority interrupts. This can seem counter-intuitive and is easy to forget! If you wish to assign an interrupt a low priority do NOT assign it a priority of 0 (or other low numeric value) as this will result in the interrupt actually having the highest priority in the system - and therefore potentially make your system crash if this priority is above configMAX_SYSCALL_INTERRUPT_PRIORITY. Also, do not leave interrupt priorities unassigned, as by default they will have a priority of 0 and therefore the highest priority possible.
The lowest priority on a ARM Cortex-M3 core is in fact 255 - however different Cortex-M3 vendors implement a different number of priority bits and supply library functions that expect priorities to be specified in different ways. For example, on the A2F the lowest priority you can specify is in fact 15 - this is defined by the constant configLIBRARY_LOWEST_INTERRUPT_PRIORITY in FreeRTOSConfig.h. The highest priority that can be assigned is always zero.
It is also recommended to ensure that all four priority bits are assigned as being premption priority bits, and none as sub priority bits.
Each port #defines 'BaseType_t' to equal the most efficient data type for that processor. This port defines BaseType_t to be of type long.
Note that portEND_SWITCHING_ISR() will leave interrupts enabled.
This demo project provides examples of FreeRTOS interrupt service routines - namely GPIO8_IRQHandler() defined in main-full.c and main-blinky.c, and the Ethernet MAC interrupt handler.
Only FreeRTOS API functions that end in "FromISR" can be called from an interrupt service routine - and then only if the priority of the interrupt is less than or equal to that set by the configMAX_SYSCALL_INTERRUPT_PRIORITY configuration constant.