| |||||||


|
Hands-on Tutorial
|
const char *pcApplicationNabtoDeviceURL( void )
{
static const char * pcURL = "my.local.demo.net";

    /* Return the URL that will be used by the device.  The URL must be in
    persistent memory (not declared on the stack of this function), and
    unique on the network.

    A unique URL can be created by prefixing the main URL with the serial
    number or MAC address of the device (or any other unique identifier).

    It is ok in this case to use a simple constant string, provided only one
    instance of this project is connected to the network at any one time, and
    that the default project configuration is not changed to allow remote
    access. */
    return pcURL;
}
Listing 1: The implementation of pcApplicationNabtoDeviceURL() in main.c of the tutorial project
|
A unique URL can be created by prefixing the main device URL with the
device's serial number, MAC address, or any other value unique to the
device. The tutorial project can get away with using the hard coded
address my.local.device.net without such a prefix because the
scope of its network visibility is limited to the local network. That
is only true, of course, provided only one instance
of the tutorial project is connected to the local network at any one time.
Network configuration
The tutorial project is supplied with ipconfigUSE_DHCP set to 0 in FreeRTOSIPconfig.h. As DHCP is not used a static IP address must be configured.
-
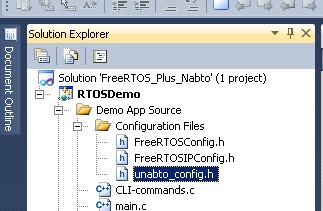
Open FreeRTOSConfig.h (see image 1 above).
-
The static IP address is set by the constants configIP_ADDR0
to configIP_ADDR3. Edit these constants to appropriate
values for your network. The chosen address must be compatible with
the network, and unique on the network (the IP address will
be compatible if its first three octets match the first three
octets of other IP addresses on the same network).
- Most Windows computers have more than one physical network interface, so it is necessary to define which interface the tutorial will use. A mapping of interfaces to interface numbers is displayed when the tutorial application is executed (see Figure 4 below). Set configNETWORK_INTERFACE_TO_USE to the number of the interface to use.
While FreeRTOSConfig.h is open it is also worth pointing out
the configMAC_ADDR0 to configMAC_ADDR5 constants. These
set the (virtual) MAC address used by the tutorial. The default MAC
address will not need changing unless you connect more than one instance of the
tutorial project to the same network - in which case each instance must
use a unique MAC address (and a unique URL as already noted).
The Nabto Base Directory
It has already been seen that user interfaces to FreeRTOS+Nabto devices are created using standard web technologies, such as HTML files, image files, and Javascript. When you connect to a FreeRTOS+Nabto device the user interface files for that device are automatically downloaded from a cloud server and stored in the Nabto base directory.
Locating the Nabto base directory
-
If you have not already done so, view the live demo in the Firefox
web browser. The live demo's user interface files will be
saved into the Nabto base directory.
-
Locate the Nabto base directory. Its location is dependent
on your operating system. Refer to the following table.
OS Nabto Base Directory Linux ~/.nabto Windows %USERPROFILE%\AppData\LocalLow\Nabto Older Windows versions %USERPROFILE%\Local Settings\Application Data\Nabto
Contents of the Nabto base directory
The Nabto base directory contains a sub directory called html_dd, in which further sub directories are created to store user interface files. Figure 2 shows the sub directory created by connecting to the live demo:-
The name of the directory is the URL of the live demo.
-
html_device_driver.zip is a file that contains all the
user interface files required to view and interact with the live
demo. This is the file received from the cloud server.
-
static is a directory that contains the HTML, Javascript,
image files, etc. that make up the live demo's user interface.
The static directory was extracted from
html_device_driver.zip.
-
nabto is a directory that contains the
XML file
that describes the Nabto queries implemented in the live demo.
The nabto directory was extracted from html_device_driver.zip.
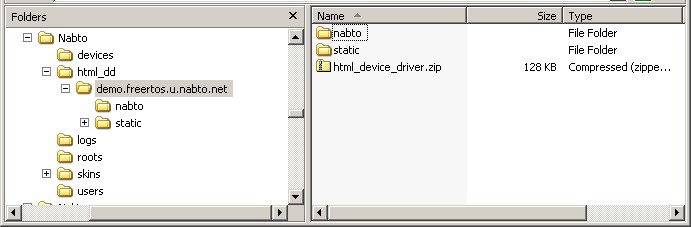
Figure 2: The html_dd directory viewed in the Windows explorer
The user interface files for the tutorial project are not downloaded
from a cloud server, so must be placed into the html_dd directory manually.
The files used by the live demo are re-used for the tutorial project by copying
them into an appropriately named directory.
-
Copy the contents of the demo.freertos.u.nabto.net directory
into a new directory in the same location called
my.local.demo.net (assuming the URL used by the
tutorial project has not been changed from its default).
See image 3.
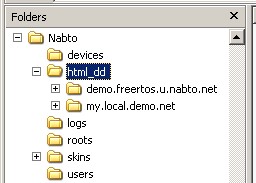
Figure 3: The html_dd directory with the new my.local.demo.net directory
Running the Tutorial Project
-
Start the tutorial project executing by selecting "Start Without
Debugging" from the Visual Studio's Debug menu. A Windows
console window will open that displays the available
network adaptors and the network configuration.
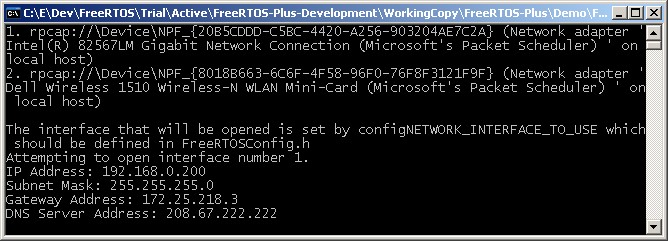
Figure 4: The Windows console showing the available interfaces and network configuration
-
Open Firefox and enter nabto://self/discover in
the address bar. The Nabto plug-in will search for locally
accessible FreeRTOS+Nabto devices. If all is well it will
recognise the tutorial project (running in the Windows simulator)
as a device and display its URL (see the trouble shooting section if not).
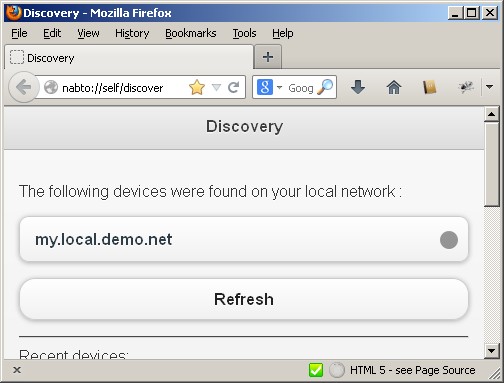
Figure 4: Locating the tutorial application using the discovery URL
-
Click the URL in the web page to view the user interface -
which will be exactly the same as that of the Live demo.
-
Try editing index.html in the html_dd/my.local.demo.net/static
directory (the directory that was created in the nabto/html_dd
directory), then refresh the page in Firefox to see your edits.
-
Remember the Windows simulator will not exhibit real time
behaviour, and one simulated ms actually takes approximately
40ms to execute!
Trouble shooting
The windows simulator creates a virtual network interface by reading and writing raw Ethernet data through a real network interface. Any connection problems encountered are likely to be related to the operation of the virtual interface, not the operation of the FreeRTOS+Nabto code.This section contains things to try if you are not able to connect to the tutorial when it is running.
Ping
Try pinging the configured IP address. If ping replies are received then it is likely the problem is not related to the network configuration.
Wired Vs Wireless network interfaces
Try using a wired network rather than a wireless network. If that is not possible try connecting to (or pinging) the project from a different computer on the same network.
Firewall
We often see in corporate environments that the IT department enforces a policy on windows machines that prevents a unicast response to a broadcast request. The following URL provides information on how to check if unicast responses are allowed on your machine: http://technet.microsoft.com/en-us/library/cc742429.aspxTry temporarily disabling any firewall or other network filtering software (don't forget to turn it back on again immediately after your test!).
Hubs and Switches
Intelligent hubs and switches can shield network nodes from traffic. Try connecting through a dumb hub.If Firefox and the tutorial project are running on the same computer then an external network connection is not actually required at all, although Windows does need to recognise the network interface as being 'up' so the network cable does need to be plugged into something that can negotiate a link (this could just be a hub that has nothing else plugged into it).