FreeRTOS+TCP and FreeRTOS+FAT Examples
Running on a Xilinx Zynq dual core ARM Cortex-A9 SoC
[Buildable TCP/IP and FAT FS Examples]
Introduction
 Don't have any hardware? You can still try the RTOS TCP and FAT examples
now by using the
Win32 demo, which uses free tools, and runs in a Windows environment.
Don't have any hardware? You can still try the RTOS TCP and FAT examples
now by using the
Win32 demo, which uses free tools, and runs in a Windows environment.
The Zynq FreeRTOS+TCP and FreeRTOS+FAT demo includes the following standard examples:
FreeRTOS+FAT is used to create and format a RAM disk, then mount both
the RAM disk and a FAT formatted SD card in the same virtual
file system. The mounted file systems then provide the storage for both
the FreeRTOS+TCP FTP and HTTP server examples.
The RAM disk is accessible
even if an SD card is not inserted.
The project builds using the free Xilinx SDK
GCC based development tools, and hardware projects are
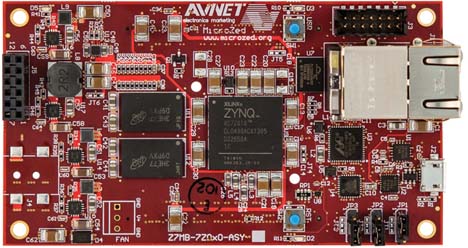
provided that allow the demo to run on either the
ZC702 or lower
cost MicroZed
evaluation boards.
Important Note: Due to the combination
of memory caching and DMA requiring 32-byte multiples, it is necessary
to use
BufferAllocation_1.c
with this demo.
Instructions
Prerequisites
The following are required to build and run the FreeRTOS+TCP and
FreeRTOS+FAT examples on a Xilinx Zynq SoC:
-
Either a ZC702 or MicroZed evaluation board.
[The FreeRTOS TCP/IP and FAT middleware components can also
be evaluated using the
the FreeRTOS Windows port
without the need to purchase any special hardware]
-
An installation of the Eclipse based Xilinx SDK development tools. The demo
is always released with a project that is compatible with whatever
is the latest SDK version at the time of release.
-
The FreeRTOS Labs source code download.
No specific hardware setup is required.
Opening the Project
Note: Previous FreeRTOS Labs releases required the end user to
create the BSP project - which can be done automatically by the
SDK. Now the BSP project is distributed along with the hardware
and application projects, so there is no need to create the BSP
as a separate step.
The Eclipse project builds files from various directories within
the FreeRTOS-Labs source tree, so ensure the directory structure
has not been modified.
-
Start the SDK Eclipse IDE, selecting an existing Eclipse
workspace or create a new workspace when prompted.
-
Select "Import" from the IDE's "File" menu. The Import dialogue
will appear.
-
In the Import dialogue, select "General->Existing Projects Into Workspace",
then navigate to and select the /FreeRTOS-Plus/Demo/FreeRTOS_Plus_TCP_and_FAT_Zynq_SDK
directory within the FreeRTOS Labs source code directory tree.
-
Four projects will
appear in the projects window of the Import dialogue, as shown
below. Ensure the RTOSDemo and RTOSDemo_bsp projects are selected,
then also select either the MicroZed_hw_platform or the ZC702_hw_platform
depending on the development board in use.
Click the "Finish" button to close the Import dialogue.
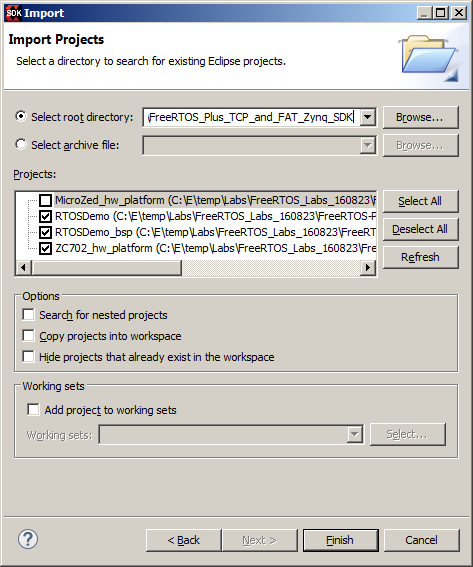
Importing the projects
-
Right click the "RTOSDemo" project in the Project Explorer
and select "Refresh" from the pop up menu.
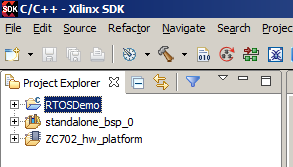
The three projects in the Eclipse Project Explorer
-
It should now be possible to build the project.
Right click the "RTOSDemo" project in the Eclipse Project Explorer window
once more. This time select "Build Project" from the pop-up
menu.
Software Setup #1: Setting a Static or Dynamic IP Address
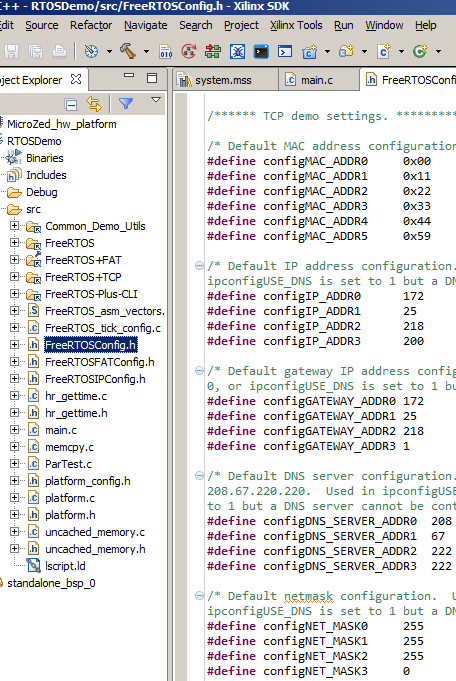
Network address settings in FreeRTOSConfig.h
The FreeRTOSIPConfig.h
and FreeRTOSConfig.h header files are the
FreeRTOS+TCP and FreeRTOS configuration files respectively. Both can be opened
from within the SDK's Eclipse IDE.
If a DHCP server
is present on the network to which the Zynq is connected then
set ipconfigUSE_DHCP to 1 in FreeRTOSIPConfig.h, and no further IP address
configuration is necessary. It is not necessary to know the IP address
allocated to the Zynq by the DHCP server if a
hostname is configured, because the Zynq can be
located by its name directly. The IP address can however be
viewed, as it is output using the UDP logging facility.
If there is no DHCP server connected to the network then set ipconfigUSE_DHCP to
0 in FreeRTOSIPConfig.h, then configure the IP address and
netmask
manually. The IP address and netmask are set using
the configIP_ADDR0/3 and configNET_MASK0/3 constants respectively in FreeRTOSConfig.h.
Note the IP address setting is in FreeRTOSConfig.h rather than
FreeRTOSIPConfig.h because it is related to the application,
rather than being a TCP/IP stack configuration option.
When manually setting the IP address it is necessary to ensure the chosen
IP address is compatible with the netmask. In most cases
a compatible IP address will be one that uses the same first three octets
as the host computer. For example, if the IP address of the
host computer is 192.168.0.100 then
any 192.168.0.nnn address (other than when nnn is 0 or 255, and any other address
already present on the network) will be compatible.
It is also necessary to set a gateway
address that is also compatible with
the netmask. This step is necessary even if the gateway does not actually
exist on the network (otherwise an internal sanity check will trigger a
configASSERT()
failure). The gateway address is set using the
configGATEWAY_ADDR0/3 constants in FreeRTOSConfig.h.
Software Setup #2: Setting the MAC Address
The MAC address is set using the configMAC_ADDR0/5 constants in
FreeRTOSConfig.h.
If only one embedded target that is running the example is connected to the network
then it will not be necessary to modify the MAC address.
If multiple embedded targets that are running FreeRTOS+TCP examples are connected to the
same network then it will be necessary to ensure each computer has a
unique MAC address.
It is often more convenient to identify a node on the network using a
name, rather than an IP address. This is especially the case when the
IP address is not known. For example, rather than sending a ping
request to an IP address, such as "ping 192.168.0.200", a ping request
can instead be sent to a hostname, such as "ping MyHostName" (where
MyHostName is the name assigned to the network node).
If only one embedded device that is running a FreeRTOS+TCP example is connected to the
network then it will not be necessary to modify the default hostname,
which is "RTOSDemo". If multiple embedded devices that are running the example
are connected to the same network then it will be necessary to assign a
different hostname to each embedded device.
The hostname is set by the mainHOST_NAME constant at the top of the
main.c source file.
Depending on the network topology, it may also be possible to use a second
hostname set by the mainDEVICE_NICK_NAME constant, which is also
defined at the top of main.c.
Software Setup #4: Setting the Echo Server Address
If the TCP echo client example is used then set the constants
configECHO_SERVER_ADDR0 to configECHO_SERVER_ADDR3
in FreeRTOSConfig.h to the IP address of a
suitable echo server.
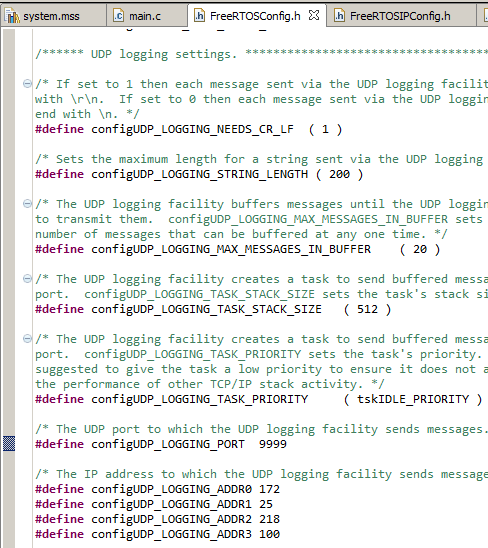
Logging configuration in FreeRTOSConfig.h
FreeRTOSIPConfig.h is provided with
FreeRTOS_debug_printf()
disabled, and FreeRTOS_printf()
set to send TCP/IP stack and application logging messages over UDP.
The IP address and port number
to which the UDP logging messages are sent, along with a few other
logging related parameters, are set using constants within FreeRTOSConfig.h,
which are shown in the image on the right.
Log messages are buffered for transmission by a low priority background
RTOS task.
Log output can be viewed in many different terminal programs.
UDPTerm,
from Cinetix, it a convenient free standing utility that can be
used for this purpose.
Running Examples
Now the hardware and software are configured the examples can be executed.
The instructions below describe how to download then execute the application
from RAM:
-
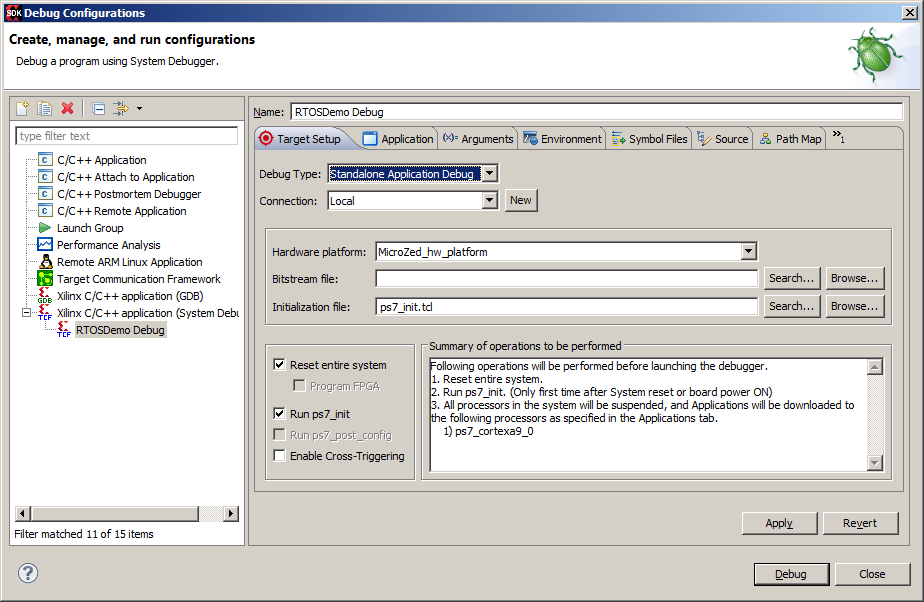
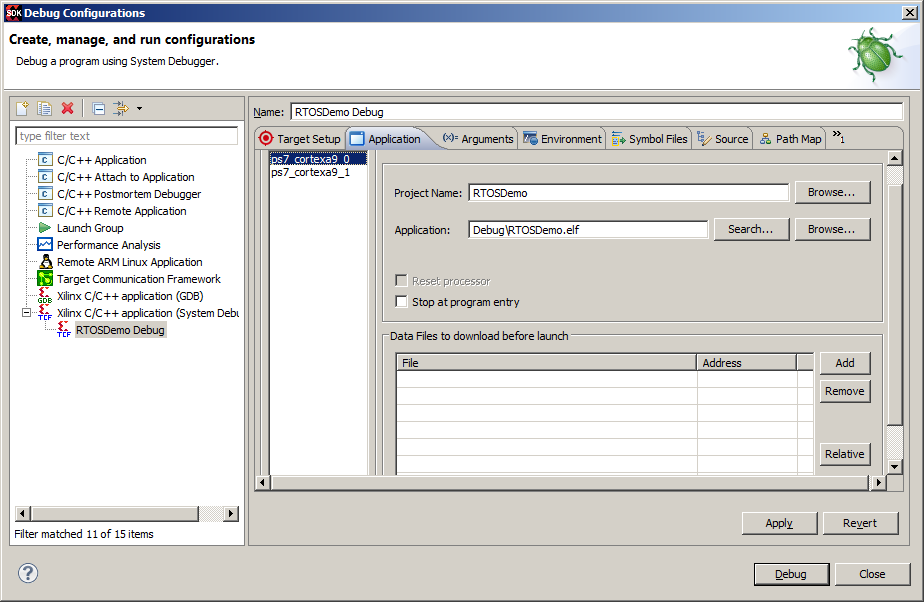
First it is necessary to create a debug configuration.
Select "Debug Configurations..." from the IDE's "Run" menu. The
Debug Configurations dialogue will appear.
-
Double click the "Xilinx C/C++ application (System Debugger)"
option to create a new debug configuration.
-
Complete the new debug configuration's tabs as shown in the
images below. The images assume the MicroZed hardware platform
is being used.
-
Ensure the Zynq evaluation platform is connected to the host
computer using an appropriate debug connection, then press
the "Debug" button to close the Debug Configurations dialogue,
download the application to RAM, and start a debug session.
Basic Connectivity Test
Before experimenting with the examples below it is advised to test basic
connectivity by starting the application running, then pinging the target.
If ping replies are received then the application is both running and
connected to the network correctly.
To ping the device, open a command prompt and type "ping RTOSDemo", assuming
the hostname has not be changed from the default of RTOSDemo.
If a ping reply is not received then turn DHCP off, assign the target a
static IP address, and try again using the assigned IP address in place of the host
name.
Instructions describing how to set a static IP address, and how to set
a hostname, are provided in the setup instructions on this page.
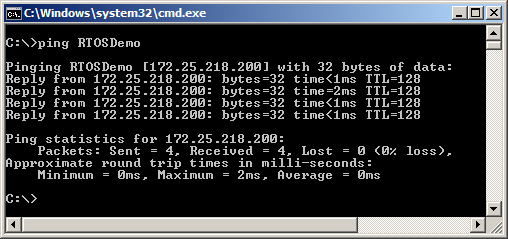
Pinging the target, and receiving ping responses
Included Examples
The project includes the following examples: