Example FreeRTOS+UDP Project
For the FreeRTOS Win32 Simulator
On this page:
This demo application is available in the following directory
of the offical FreeRTOS zip file download:
FreeRTOS-Plus/Demo/FreeRTOS_Plus_UDP_and_CLI_Windows_Simulator
The project uses the
FreeRTOS Windows simulator.
The Windows simulator provides a convenient evaluation platform, but it
does not exhibit real time behaviour. Simulated time is much slower than
real time.
The project is pre-configured to build with the
free Express edition of Microsoft Visual C++
(MSVC). MSVC Express Edition 2010 was used.
The demo includes the following standard demo files:
-
The two echo client tasks
-
A command console with IP stack specific commands
The project can optionally be built to also include:
-
Two sets of simple client and server tasks, where the client
task sends data to the server task. One set of tasks uses the
standard sockets interface. The other set of tasks uses the zero
copy sockets interface.
-
Two tasks that demonstrate how to use FreeRTOS_select().
A number of sockets are created and added to a set. One task then
blocks on the set while the other task sends data to a (pseudo) random
member of the set.
FreeRTOS+UDP is used to allow the command console to be accessed
via a UDP terminal. See the Usage Instructions section below.
-
Download the zip file that contains the source code and project
files. Extract the zip file into a convenient location, ensuring
the directory structure is maintained.
Note: The directory structure is designed to fit into the
standard FreeRTOS .zip file download, making it seem non-optimal when
seen in isolation.
-
Open the Visual Studio solution file FreeRTOS_Plus_UDP_with_CLI.sln
from within the Visual Studio IDE. The solution file is located
in the "FreeRTOS-Plus/Demo_Projects_Using_FreeRTOS_Simulator/FreeRTOS_Plus_UDP_with_CLI"
directory.
-
The demo uses WinPCap to create a virtual network connection by
accessing raw Ethernet data on a real network connection. Many
computers have more than one real network port. Set
configNETWORK_INTERFACE_TO_USE to tell the demo which real port
should be used to create the virtual port.
configNETWORK_INTERFACE_TO_USE is defined in FreeRTOSConfig.h.
Available port numbers are displayed on the console when the
application is executed (see the image in the Usage Instructions
section below).
-
Follow the instructions provided on the
Echo Client example documentation page
to set up an echo server and set the address of the echo server
in FreeRTOSConfig.h. Alternatively simple local client and
server tasks can be created by setting mainCREATE_SIMPLE_UDP_CLIENT_SERVER_TASKS
to 1 in main.c.
-
The virtual port has its own MAC address.
Set the constants configMAC_ADDR0 to configMAC_ADDR5 to ensure
the MAC address used by the virtual network connection is unique on the network. The constants
are located at the bottom of FreeRTOSConfig.h.
-
If IP address assignment is managed by a
DHCP server
then no further configuration is required.
If IP address assignment is not managed by a DHCP server then set
ipconfigUSE_DHCP to 0 in FreeRTOSIPConfig.h,
then edit the constants at the bottom of FreeRTOSConfig.h that
set the default values for a static IP address, DNS server address,
gateway address and netmask to ensure they are valid for the
Ethernet network. The IP address will be valid if the first three
octets of the IP address match the first three octets of other
IP addresses on the same network - each IP address must be unique
on the network.
-
Select "Build Solution" from the IDE's Build menu (or press F7)
to build the application.
The standard Visual Studio
key used to start a debug session and break on entry to main() is F10.
The same host computer is used to build the application, debug the application,
and (because the FreeRTOS Win32 simulator is used) run the application.
There are no special debugging instructions.
-
The UDP/IP Related CLI Commands
page contains a video that demonstrates:
-
Connecting to the FreeRTOS command line interface.
This demo uses UDP in place of the demonstrated COM port -
see note 1 below.
-
Viewing the IP address assigned to the target hardware
by the DHCP server.
-
Using the DNS resolver to ping a host name.
-
Viewing the network traffic between the echo client
(the FreeRTOS+UDP application) and the echo server.
Note 1:
The video shows FreeRTOS+CLI being access through a virtual COM port.
This demo connects to FreeRTOS+CLI though a UDP port.
Suitable free UDP capable dumb terminal programs include
YAT and
Hercules.
To allow a UDP connection to be established
the IP address assigned by the DHCP server to the (simulated) target
is displayed in the
Windows console that opens when the application
starts to execute.
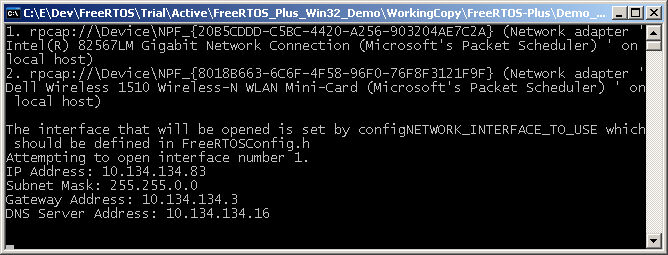 The available network interfaces and the configuration obtained
from a DHCP server shown in the Windows console
NOTE 2:
FreeRTOS+CLI receives commands on UDP port 5001 and sends output
to UDP port 5002.
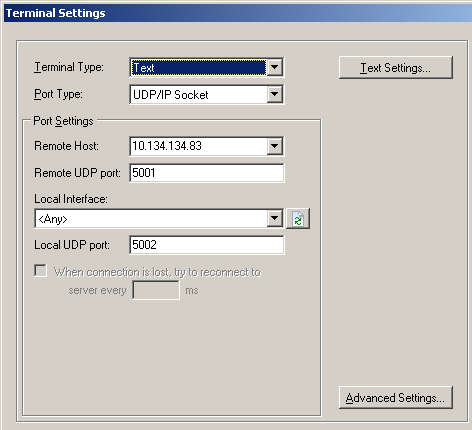 Configuring the YAT terminal to access the command
interface running on IP address 10.134.134.83
Note 3: Ping replies
are also displayed in the Windows console (so replies to ping
requests sent through the FreeRTOS+CLI console are display
in the Windows console).
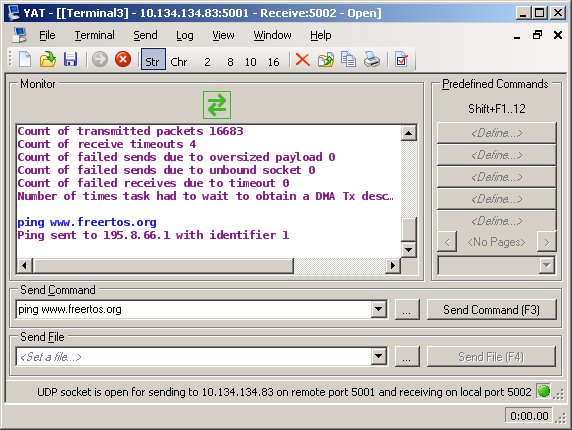 Using YAT to send an ICMP echo (ping) request. In
the FreeRTOS Windows simulator
Using YAT to send an ICMP echo (ping) request. In
the FreeRTOS Windows simulator
environment the
ping reply is displayed in the Windows console, not
the FreeRTOS console.
-
Increasing the value of echoLOOP_DELAY in TwoEchoClients.c will
decrease the amount of network traffic that is generated.
-
The following constants are defined in main.c to allow tasks to
be included or excluded from the build:
#define mainCREATE_UDP_CLI_TASKS 1
#define mainCREATE_SIMPLE_UDP_CLIENT_SERVER_TASKS 0
#define mainCREATE_UDP_ECHO_TASKS 1